
Well, well, well! Look who’s here! Are you the person who is fascinated by the concept of tiled galleries and eager to learn more about them?
Perhaps, you’re looking to add a visually striking tiled gallery to your website that will look great on different devices but struggling to find a starting point.
We know you have a multitude of questions swirling in your mind. Don’t worry; we’ve got your back!
Forget dull, plain galleries that look like something from the Stone Age. In this article, we’ll show you a simple and effective solution for designing a visually stunning tiled gallery that will capture the attention of your website visitors.
So, buckle up, and join us on this exciting journey that will take your website from “meh” to “WOW!” in no time.
Table of contents
A bit about Tiled galleries
Tiled galleries allow users to showcase their images in a grid-like layout, where each image occupies its designated space in the grid. And the best part? The images automatically resize to fit into the format. Talk about smart!
If you want to create effective and dynamic tiled galleries, keeping some preliminary considerations in mind is essential.
First, consider the image count you want to display in your gallery. Too many images in a single gallery can be overwhelming for viewers, but too few, and you won’t be doing your content justice.
It’s all about finding that sweet spot.
Secondly, look for consistency in image sizes to create a visually balanced and aesthetically pleasing gallery.
But don’t worry; you don’t have to do all the hard work yourself. Our plugin can make your tiled gallery creation process much smoother.
Introducing the tool
Modula
If you want to create awe-inspiring galleries on your WordPress website, Modula is the plugin you need. With 100000+ active installations and 400+ 5-star ratings, it’s a popular choice among WordPress users.
Modula’s intuitive and user-friendly dashboard makes it ideal for users of all skill levels. It boasts various features, including SpeedUp, Hover effects, Pagination, Filters, and Gallery protection. Moreover, it’s worth noting that the plugin works seamlessly for both image and video galleries.
You can quickly start with the free version, which offers exciting features. If you want to take things up a notch and add some serious style and sophistication to your galleries, we recommend you upgrade to the Pro version.
Why not try Modula and see the notable difference it can make to your WordPress website?

Modula Gallery Plugin
Create stunning, responsive photo galleries with ease. Showcase your work, captivate your audience, and boost engagement. You don’t need to do any coding.
Creating Tiled Galleries in WordPress with Modula
Activating Modula Lite
To install and activate Modula, follow a few simple steps as briefed below.
- Open the WordPress dashboard and hover your mouse over the Plugins tab to uncover the sub-menu. From here, click on Add New to proceed.
- On the new page, use the search bar to look for Modula (developed by WPChill). Once the plugin appears, click the Install button to initiate the installation process.
- After the installation is complete, Activate the plugin. On successful activation, refresh the page, and you should see a new option in the left slider menu on the WordPress dashboard named Modula.

That was easy, right? Now, the exciting part begins! We’ll dive into the process of creating your very own gallery. So, keep up!!
Create a new gallery
To create a beautiful tiled gallery using Modula, you have two options – either work with an existing gallery or create a new one from scratch. If you’re starting fresh, here’s what you need to do.
First, hover your mouse over the Modula tab, and click the Galleries option. Then select Add New to begin the gallery creation process.
On the new page, you’ll see several options to fill out, including the Title, Gallery, and Settings. In the Gallery section, you can add photos from the WordPress media library by choosing Select from Library or Upload image files directly from your computer.
But the real fun starts with the Settings tab; you can let your creativity run wild with the options available.
Before moving on!! It would help if you asked yourself a question. What kind of tiled gallery do I want to display on my website?
Are you going for a neat, tidy, squared look or a more artistic and varied mosaic style? Maybe a classic column-tiled layout is more your thing?
Luckily, with Modula’s free version, you can access a range of gallery types we require for this article, including Creative Gallery, Custom Grid, and Masonry. Each option creates a uniquely styled tiled gallery, so take some time to explore the features we’ll discuss below and choose the perfect fit for your website.
Create a tiled gallery with Creative Gallery
Are you sick of countless hours tweaking your photo galleries to end up seeing mediocre results? Well, fret no more – the Creative Gallery type is here to save the day!
This fantastic feature does all the hard work for you, automatically creating a stunning Mosaic-style tiled gallery with just a few clicks. And, thanks to its innovative algorithm, your photos will be arranged and resized to perfection.
All you need to do is fill in the title, add images in the Gallery tab, select the Creative Gallery option with default settings, and voila! Your beautiful gallery is ready to be showcased.
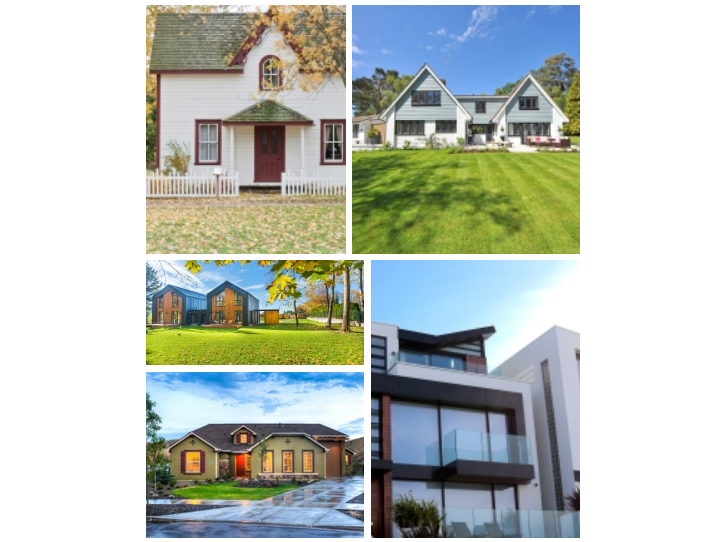
Look at the gallery created with the Creative gallery type and default settings below. It’s like a work of art.
Adjusting your Creative Gallery
If you still need to add a personal touch to any aspect of the published gallery, like image previews, height, etc., you can always go back and tweak the settings to make some nifty adjustments.
- Gutter – Want tiles to be closed or split apart? You can adjust the spacing between each image to make your gallery look like a pixel-perfect work of art.
- Width – Define how much width you would want to utilize. Adjust between 0 to 100% or write in pixels to avail the width per your tiled pattern.
- Image Size – Want your image thumbnails to look sharp and crisp? Set the minimum dimensions in pixels to define the Image Size. And if you want to get fancy, choose the custom option from the drop-down and write the image dimensions yourself.
Just a word of caution, if you enable Crop, each thumbnail will automatically be cropped down to the defined size in the Image Size field. So be careful not to choose too small dimensions, or your image previews might look blurry.
- Height – Not satisfied with the gallery’s height, and you wonder if I can make a readjustment. Well, you sure can!! Pick whatever height you want in pixels, but don’t over or under-do it if you wish your tiled gallery to look cleaner.
- Max Images Count – You’ve added many images but only want to display a select few. Well, set the number you want to show on the front end. And if you can’t decide, leave it at 0 to show all the images. For example, if you created a gallery with 100 images and want to display only 5, fill the field with 5.
We recommend only adding the number of images you want to display. If you still wish to cut a few images out of the frame, we recommend keeping the Shuffle images option disabled. Otherwise, you might see a different-styled mosaic tiled gallery every time your users refresh the page, as random images are displayed on every permutation.
Create a tiled gallery with Custom grid
Fancy going to town on your tiled galleries and adding some flair? Well, guess what? You can.
A custom grid gives you the power to create any form of a tiled gallery! You can design it to your heart’s content by defining the width and height of each image. How cool is that?
And here’s the best part: You don’t have to spend hours fiddling around with software to make it happen. All you need to do is use a quick drag-and-drop method to resize each image to fit exactly how you want it to look in the gallery.
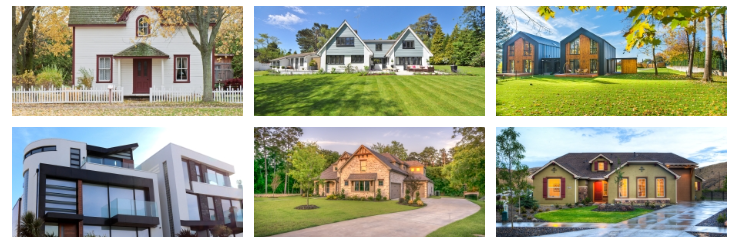
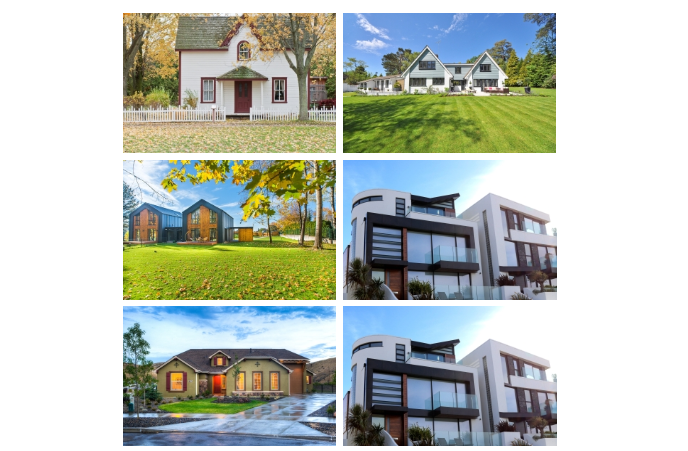
Take a look at a few different kinds of tiled galleries we’ve created with the custom grid below.


Want more fine-tuning?
Well, do you still feel the need to make changes? You’re someone who likes to fine-tune things to perfection! (We get it). Well, we’ve got you covered with a range of configurations you can use to make even further adjustments to your tiled gallery.
The settings include Gutter, Image Size, and Max image count. We have already covered what each setting means in the creative gallery.
However, there is a slight change in the Image size; if you choose custom settings, you can adjust the block size to create larger or smaller individual squares, giving you even more control over the look and feel of your gallery.
Another exclusive feature in the Custom grid that genuinely stands out is Custom Responsiveness, which you can access through Responsive Settings.
Once enabled, this feature gives you precise control over the number of columns displayed in your gallery on tablets and mobile devices.
Create a tiled gallery with Masonry
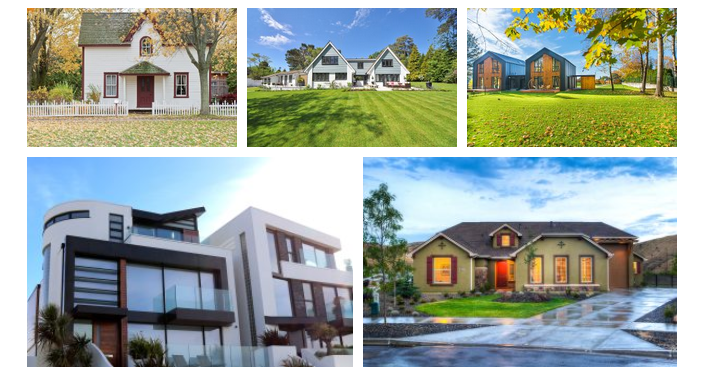
Masonry offers a robust toolset that empowers you to create stunning mosaic or column-tiled galleries quickly and easily.
In the Masonry General Settings, if you choose any number of columns in Column Type, you will see your images in the column-wise arrangement. It’s essential to remember that selecting too many columns for a limited number of images may result in an unevenly shaped gallery.
You should set the number of columns in proportion to the number of images available to achieve a balanced and harmonious layout.
To create a stunning mosaic tiled gallery using the Masonry gallery type, select the Automatic option in the Column Type and input a suitable Row Height.
It’s essential to be mindful of the Row Height value, as setting it too high could result in a single-column tiled gallery. And, of course, you would be aware of how to use other General settings in Masonry, like Gutter, Image Size, Width, and Max Image Count, to your advantage.
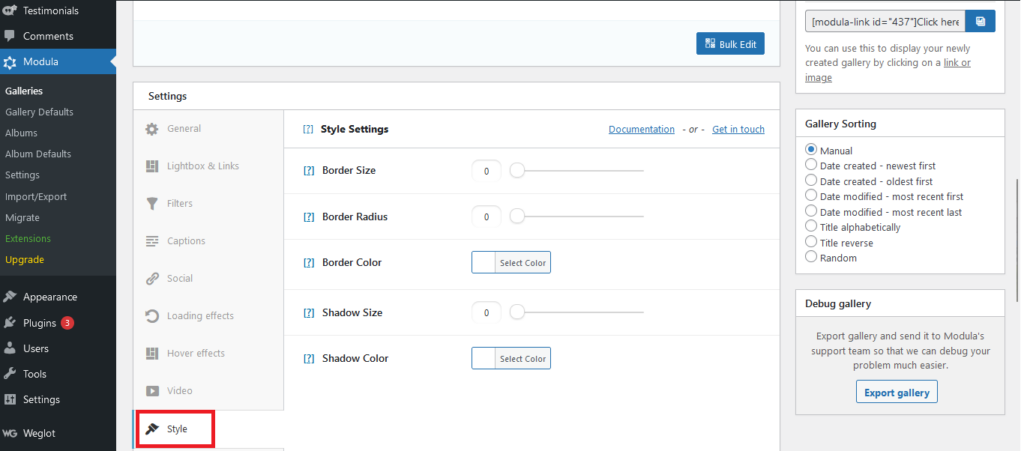
Styling your Tiled Gallery
To make your tiled galleries look even more vibrant, you can add style by selecting Style settings, where you can adjust Border size, Border radius, Border color, Shadow size, and shadow color.
If you’re interested in making your galleries private, look at Watermarking or the Passport Protection extension. Also, to discover the full potential of Modula, be sure to explore all the available plans in greater detail.
With Modula, the possibilities for creating beautiful tiled galleries are endless.
That’s a wrap
Modula is an excellent choice for creating and enhancing great-looking tiled galleries. With its advanced customization features and an extensive selection of gallery options, website owners can create tiled structures of any orientation that align with their website’s aesthetics and messaging.
Moreover, Modula’s flexibility ensures that the tiled galleries look exceptional on any device, providing visitors with a seamless and visually pleasing user experience.
Are you ready to hit the tiles? If you are, take Modula for a spin, and see what you can build.
Modula Gallery Plugin
Create stunning, responsive photo galleries with ease. Showcase your work, captivate your audience, and boost engagement. You don’t need to do any coding.