 Made in Europe, buy from Europe.
You can connect AI assistants to Modula with MCP. A compatible assistant can then create, check and edit the galleries on your WordPress site. MCP stands for Model Context Protocol. It is a shared way for AI assistants to use tools on a website.
Note: The connection works with both Modula Lite and Modula Pro. What the assistant can do still depends on the features in your package.
Below, you turn on the connection and set up your assistant. Then you make one gallery from start to finish.
What the MCP connection can do
After you connect an assistant, you can ask it in plain words to do supported Modula tasks. What it can do depends on the Modula products, plan and extensions on your site. These tasks can include:
- List and read galleries.
- Make a gallery from images already in the Media Library.
- Change a gallery’s title, status, layout, spacing and other settings.
- Add, remove or reorder gallery items.
- Use supported Modula Pro features and extensions.
Note: MCP does not give you extra product features. The assistant can use only the features in your current Modula package that are turned on for your site. If a task needs Modula Pro, a different plan or an inactive extension, the assistant should tell you so and not make the change.
Before you begin
Check these points first:
- You use a Modula version that includes AI assistants.
- WordPress 6.9 or newer is installed.
- You work on a single WordPress site. MCP connections don’t work on multisite right now. Multisite is one WordPress install that runs many sites.
- You are signed in as an administrator.
- Your site can install and activate the official MCP Adapter plugin.
- The images you want to use are already in Media > Library.
A client is the app you connect, such as ChatGPT or Cursor. For ChatGPT, Claude.ai and other cloud-based clients, your site must be open to the internet over HTTPS. HTTPS is the secure form of a web address.
A local or private development site cannot get a direct cloud connection. Neither can a site with a self-signed certificate, which is a security certificate the site made for itself.
Turn on AI assistant connections in Modula
The connection starts on the Modula Settings page.
- In the WordPress dashboard, go to Modula > Settings.
- Click AI in the settings menu.
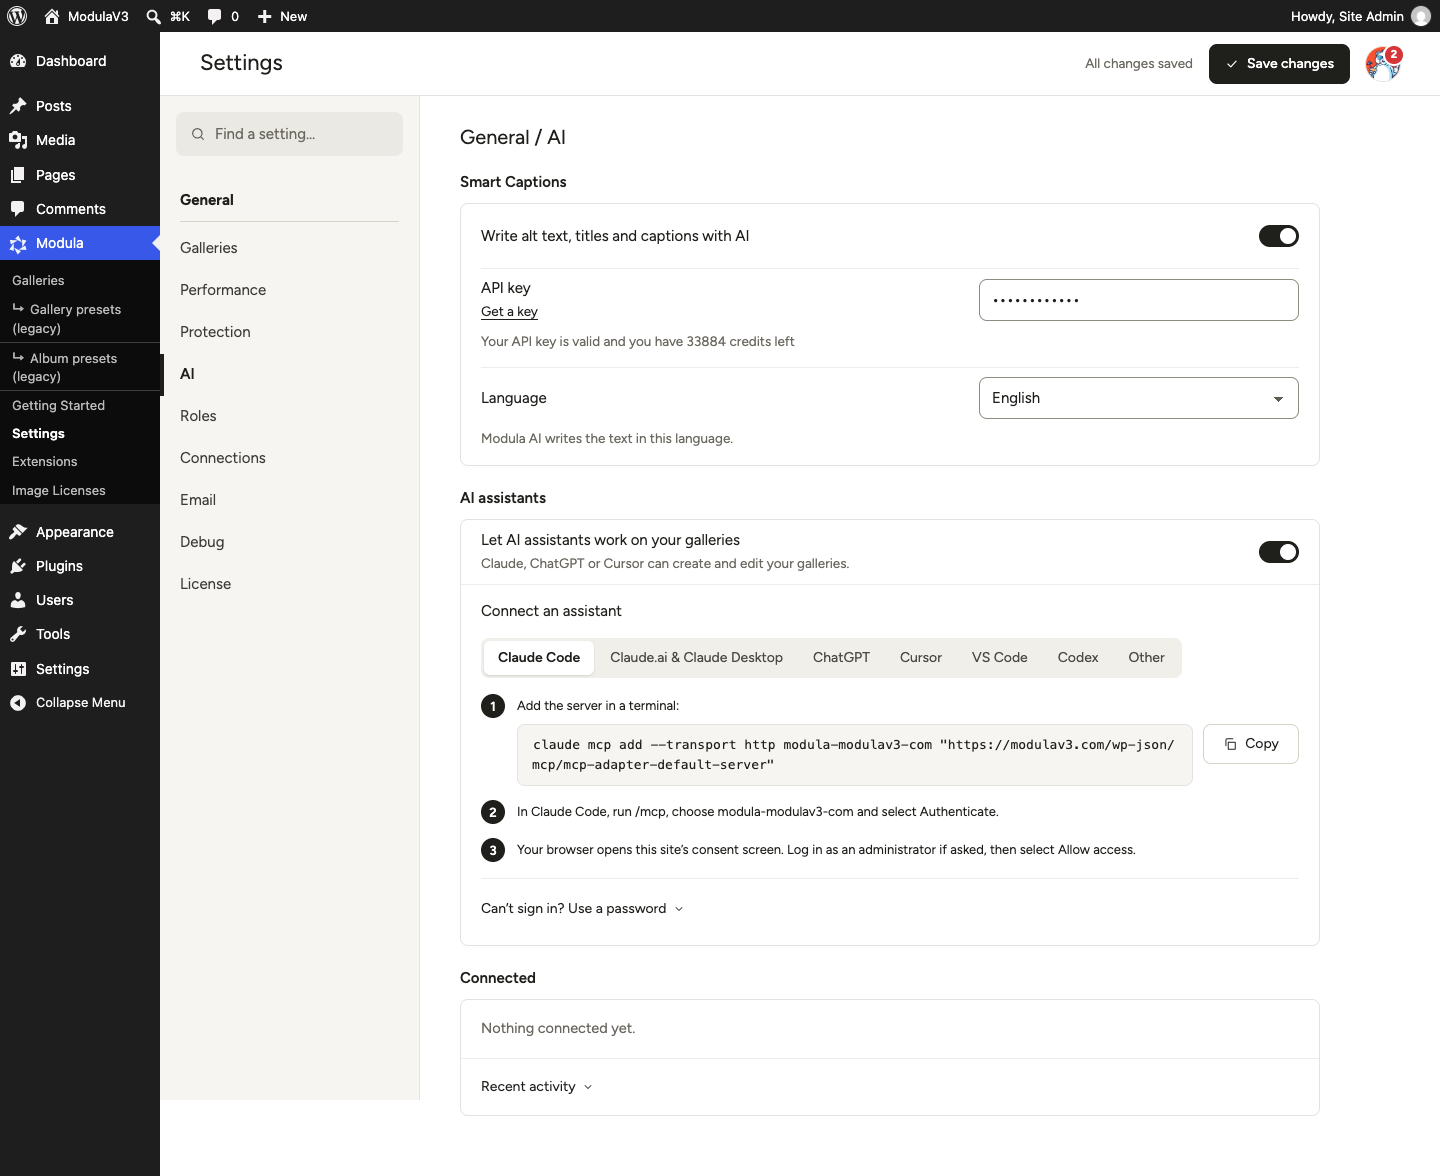
- In the AI assistants panel, turn on Let AI assistants work on your galleries.
- If Modula says the MCP Adapter is missing or inactive, click Install or Activate.
- Under Connect an assistant, pick the client you want to set up.
Note: The Smart Captions API key has nothing to do with the MCP connection. You do not need Modula AI credits to connect an assistant and manage galleries through MCP.
Connect with OAuth
OAuth is the recommended way to connect. It is a sign-in that you approve in your browser. You add the MCP endpoint to your client, sign in to WordPress in the browser, and approve the access it asks for.
The endpoint is the web address the assistant connects to. The endpoint Modula makes for your site looks like this:
https://example.com/wp-json/mcp/mcp-adapter-default-serverNow follow the steps for your client. During these steps you reach the WordPress consent screen, the page where you approve the access.
Claude Code
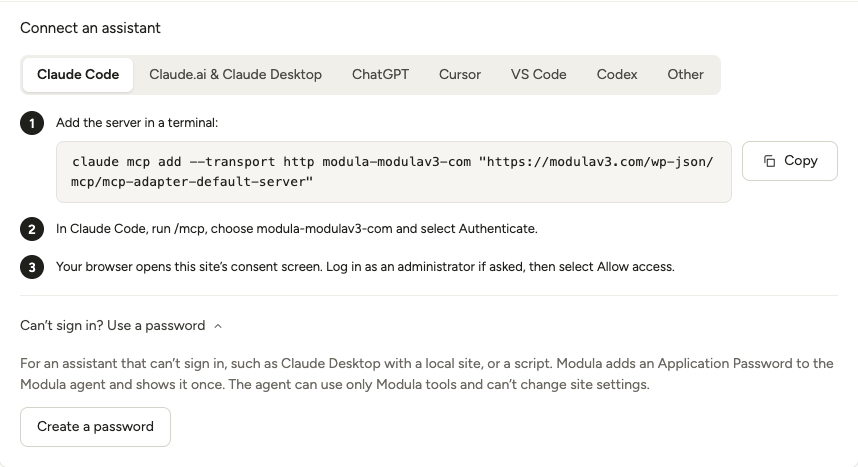
- Copy and run the command shown in the Claude Code tab:
claude mcp add --transport http modula-example-com "https://example.com/wp-json/mcp/mcp-adapter-default-server" - In Claude Code, run
/mcp. - Pick the Modula server and choose Authenticate.
- On the WordPress consent screen, sign in as an administrator if needed.
- Click Allow access.
Claude.ai and Claude Desktop
- In Claude, open Settings > Connectors.
- Choose Add custom connector.
- Enter the server name and endpoint shown in the Claude.ai & Claude Desktop tab.
- Click Connect.
- Complete the WordPress sign-in and click Allow access.
This connection starts from Claude’s servers, so your site must be public and use HTTPS. For Claude Desktop on a local site, use the password connection described below.
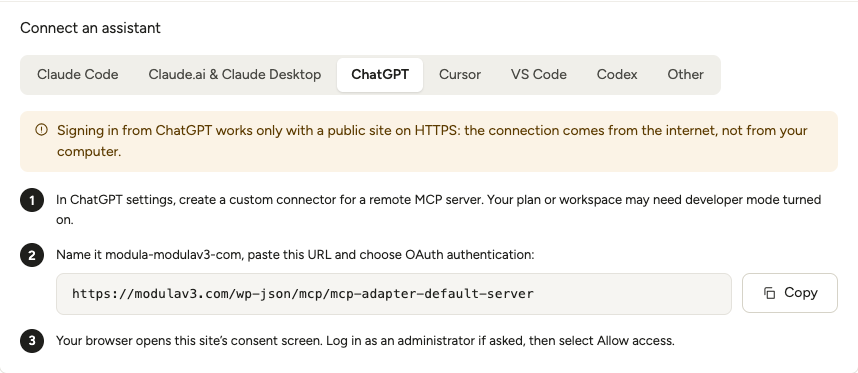
ChatGPT
- In ChatGPT settings, create a custom connection for a remote MCP server. Depending on your account and workspace, the screen may say custom connectors, apps or plugins. An administrator may need to turn the feature on.
- Use the name and endpoint shown in the ChatGPT tab in Modula.
- Choose OAuth as the authentication method.
- Start the connection or tool scan.
- When WordPress opens, sign in as an administrator if needed.
- Click Allow access.
The connection is added only after the sign-in succeeds. ChatGPT cannot connect directly to a local or private WordPress site this way.
For current ChatGPT account, workspace and MCP details, see Model Context Protocol in the official OpenAI documentation.
Cursor
Add the code shown in Modula to ~/.cursor/mcp.json, or to .cursor/mcp.json inside a project:
{
  "mcpServers": {
    "modula-example-com": {
      "url": "https://example.com/wp-json/mcp/mcp-adapter-default-server"
    }
  }
}- Open Cursor Settings > MCP.
- Pick the server.
- Choose Connect.
- Complete the WordPress consent screen.
If Modula shows an install button, you can use it and skip editing the JSON file by hand. The Add to Cursor button installs this for you.
VS Code
Run MCP: Add Server from the Command Palette and choose HTTP. Or add this code to .vscode/mcp.json or your user-level mcp.json:
{
  "servers": {
    "modula-example-com": {
      "type": "http",
      "url": "https://example.com/wp-json/mcp/mcp-adapter-default-server"
    }
  }
}
Start the server, allow VS Code to sign in, and complete the WordPress consent screen.
You can also use the Add to VS Code button to install this for you.
Codex
Add the code shown in Modula to ~/.codex/config.toml:
[mcp_servers.modula-example-com]
url = "https://example.com/wp-json/mcp/mcp-adapter-default-server"
Then start the OAuth sign-in and complete the WordPress consent screen:
codex mcp login modula-example-comOther MCP clients
Pick Other in Modula. Add the URL it shows as a remote Streamable HTTP MCP server. If the client supports MCP authorization, it should open the WordPress consent screen on its own.
Use a password connection when OAuth is not available
Some local clients, scripts and apps cannot complete the OAuth sign-in. For them, Modula can make an Application Password for its restricted MCP agent. An Application Password is a separate WordPress password for one app.
- Pick the right client in Connect an assistant.
- Open Can’t sign in? Use a password.
- Click Create a password.
- Copy the command or code right away. The password shows only once.
- Add the code to the file or app that Modula names.
- Restart the client if Modula tells you to.
The Modula agent can use only Modula tools through MCP. It cannot change general WordPress settings.
ChatGPT does not offer this password option in the Modula panel. Use its OAuth connection on a public HTTPS site.
For Claude Desktop on a local site, the code Modula makes uses the WordPress MCP proxy. It needs Node.js 22 or newer. Node.js is a program that runs on your computer. Restart Claude Desktop after you save that code.
Example: create and edit a gallery with ChatGPT
With the connection ready, you can try it out. This example makes a draft gallery from four images already in the Media Library. Then it changes the layout and publishes the gallery. Use a public HTTPS site connected to ChatGPT through OAuth.
1. Create the gallery
Start a new conversation with the Modula MCP connection turned on. Then enter:
List the images I can use from the WordPress Media Library. Create a draft Modula gallery named “MCP Documentation Demo” using the first four images. Do not publish it yet. Return the gallery title, status, item count, and shortcode.
Check the images and gallery details ChatGPT gives you. The assistant may find more than one possible target, or not know which images you mean. If so, give it the attachment names or IDs before you let it continue.
2. Edit and publish the gallery
After you check the draft, enter:
Rename the gallery to “MCP Documentation Demo – Edited”, use a three-column Masonry layout with 16 px between images, center the gallery, and publish it. Then read the gallery again and confirm the saved title, status, image count, column count, and spacing.
The assistant should read the current gallery before it edits it. Modula uses revision checks, so an update cannot silently overwrite a newer change.
3. Check the result in WordPress
- Go to Modula > Galleries.
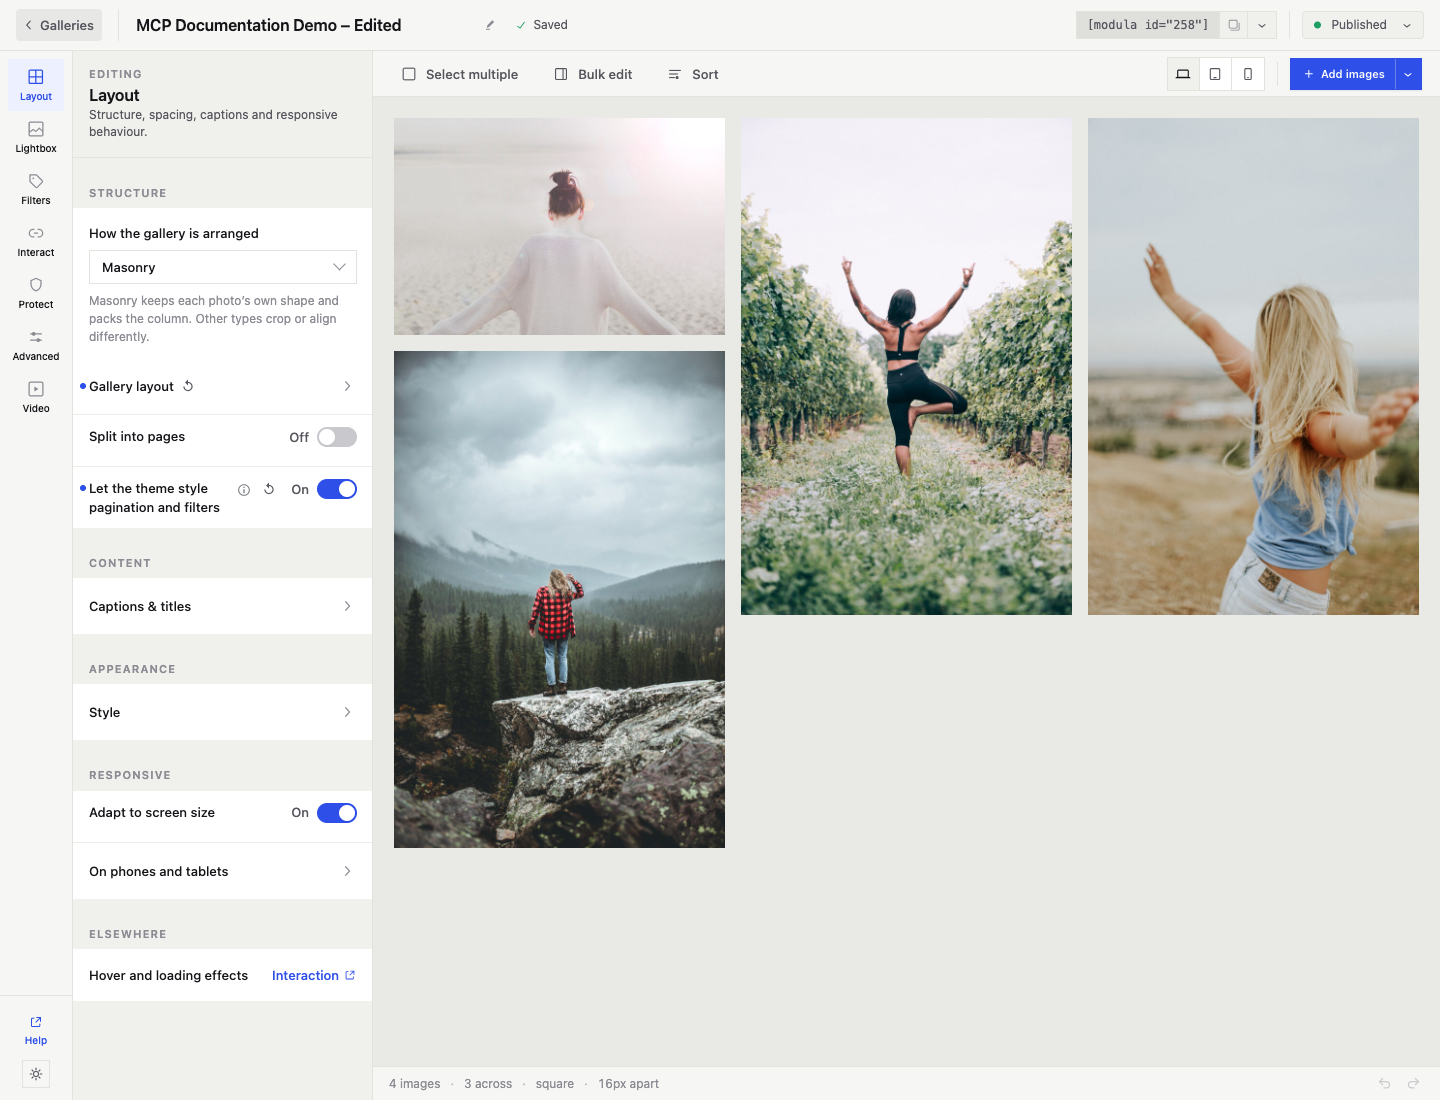
- Open MCP Documentation Demo – Edited.
- Check that the gallery is published and has four images.
- Check that the layout shows three columns and 16 px spacing.
- Copy the shortcode if you want to place the gallery on a page or post.
Our test gave a published gallery with four images, three columns and 16 px spacing.
Manage connections and review activity
Go back to Modula > Settings > AI > AI assistants to manage access:
- Connected: Lists active OAuth and password connections.
- Disconnect: Removes one connection and leaves the others alone.
- Regenerate: Replaces the password of a password connection.
- Recent activity: Lists connection events and tool calls. It does not store tool arguments or passwords.
- Let AI assistants work on your galleries: Turning this off stops Modula’s managed AI connections until you turn it on again.
Disconnect clients you no longer use. If a password may have been exposed, regenerate it or disconnect that connection right away.
Troubleshooting
Find the problem you see below. Each one lists what to check.
The AI assistants panel is missing
- Update Modula to a version that includes MCP connections.
- Check that you are signed in as an administrator. Only users who can manage site options see the panel.
Modula asks for the MCP Adapter
Click Install or Activate in the AI assistants panel. If your account cannot manage plugins, ask a WordPress administrator to install and activate the official MCP Adapter plugin.
A cloud client cannot reach the site
- Check that the site is public and has a valid HTTPS certificate.
- Do not use
localhost, a private hostname or a self-signed certificate for ChatGPT or Claude.ai. - Check that security software, maintenance mode or a firewall does not block the WordPress REST API endpoint.
The consent screen does not open
- Check that Let AI assistants work on your galleries is on.
- Remove the unfinished connection from the client. Add it again with the exact endpoint Modula made.
- If the client does not support OAuth, use the password option when Modula offers it.
The assistant can read galleries but cannot edit them
- Check whether the connection was approved with read-only access.
- Check that the setting or extension you asked for is in your Modula package and turned on.
- Ask the assistant to tell you the exact blocker Modula returned.
Modula reports that the gallery changed
Ask the assistant to read the gallery again and retry the update against the latest revision. This safeguard stops old changes from overwriting newer edits.
A password configuration no longer works
Go back to Connected and regenerate the password. Then replace the old code in the client. If you no longer need the client, disconnect it instead.